In my previous entry, I talked about straps and straplocks. Now I am going to talk about the recommended strap heights.
As you know strap is important for every guitar player who wants to play guitar while standing. The strap height is also quite important if you want to consider playing for gigs etc. It will ultimately decides whether you look cool or not onstage. So if you want to pursue playing for gigs in the future, make a habit to adjust your straps low. Not too low until the guitar touches the floor of course. Adjust it low to a point where it is still comfortable to play but at the same time, not so high up. Search around the net for famous guitarists and look at the way they adjust the strap heights. You'll get a clearer picture from there.
The thing about adjusting your strap high is that you tend to look like a nerd. Of course, by playing high, you tend to play your guitar easily. But then you gonna look totally uncool. In this era that we live in now, image plays a very important part. And this is one of the thing that you should take note of. So keep adjusting till find the suitable strap height that balances the image and playability point that I was talking about.
Friday, May 29, 2009
Monday, May 25, 2009
Straps And Straplocks
Guitar strap is one of the most important thing to a guitarist, especially if he or she were to play in a gig. That's because most of the time, electric guitarists tend to stand up while performing. So a strap is crucial so that the guitar player can focus more on his/her playing, rather than focusing on carrying the guitar.
Usually, when a guitar player purchases a guitar, the shop owners tend to throw in a strap for free to the buyer. Most of the time, the strap that they throw in is good enough for the guitarist to play while standing up. Of course, there are certain guitars that don't go well with such straps. The headstock of a guitar such as the Gibson Explorer model, for example, tend to bow downwards if you don't constantly hold the neck while standing up. Such guitar is oddly balanced; its center of gravity is not the same as those normal guitars. Thus, such cheap straps doesn't have enough friction power when resting on the guitarist's shoulder in order to hold the guitar in place. Leather straps will do just fine with such guitars, but most of the time, it ain't free when you purchase a brand new guitar. So for new guitar players, try not to get guitars that shape like those Gibson Explorer coz you'll be spending extras on such items. But hey, if you got the money, then go for it by all means.
Once you get your straps, be sure to get a straplock. It is not cool thing to happen to you, especially when performing, when you're playing your guitar and all of a sudden, the guitar just drops on to the ground. If that happens, your guitar finishing will be damaged and in worse case scenario, you have to send it for repairs because the electronic parts inside the electric guitar is damaged as well. Try to avoid such unfortunate events from happening, especially to beginners.
One of the guitar straplock that I'm currently using is the Dunlop 7007SI Ergo Lok Strap System. It is rather cheap. You can get a pair of it for about 3-5 bucks. Below is how the Dunlop 7007SI Straplock looks like:
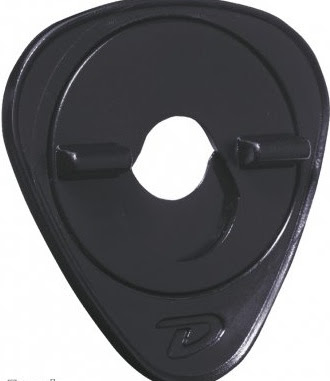
Fig. 1: Dunlop Guitar Straplock
Here are the simple steps for you to use such straplocks:
1. Make sure the straphole is in the strap pin first.
2. Place it above the straphole that is already at the strap pin
3. Twist straplock's handle clockwise.
4. Repeat step 1-3 for the other strap pin.
There. Now your strap is secured. :-)
Sunday, May 24, 2009
Tuning Your Guitar
There are many methods in which you can tune your guitar. Let's look at the two common method that are usually used.
Method 1:
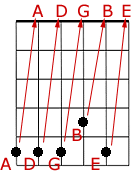 The first one requires a reference pitch on one of the strings, usually from a piano or another guitar. For example, once you manage to get the sixth string (Low E) in tune, place your finger on the fifth fret of the sixth string, pick it, and then pick the 5th string (on open end i.e. without pressing any frets) as well. Compare the two sound. If the 5th string sounds higher or lower than the 6th string, tune accordingly until both sounds the same. Do that on all the strings except when you are tuning the second string. When tuning the second string, press the 4th fret of the 3rd string, then let the 2nd string ring openly. Compare the sound and adjust the machine head accordingly.
Fig. A: Method 1 of tuning your guitar
Method 2:
The second method involves using a guitar tuner. You can get such tuners at any guitar shop. I highly recommend this method because it lets you train your ears, especially in your beginning stage, to hear the notes correctly. Once you've developed such skill, you'll know yourself if your guitar is out of tune or not.
Another reason why I emphasize on this is that when you're going to perform on stage, you'll sound amateurish if you tune your guitar using method 1. This is because when you tune using method 1, you're gonna make a lot of noise and it will give a bad impression on the audience. Furthermore, you need to rely on other instruments to get the pitch right, thus contributing to the noise. And what if other instruments are not tuned correctly as well? Then you'll be tuning your guitar wrongly also. With a tuner, you can tune your guitar quietly, easily and precisely without the need of relying on other instruments as opposed to method 1.
Here's how it works (The functions of every tuner is about the same as what I'm going to show you):
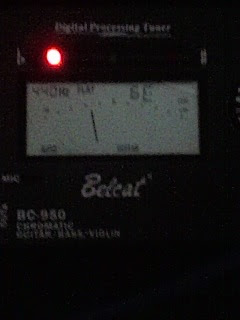
When you pluck your guitar, if you see that the pointer is not pointing forward or the red light is flashing, just like in Fig. A, then you know that the guitar is out of tune. All you have to do is adjust accordingly. If your pointer is pointing more to the left, just like in Fig. A, then it means that your note is flat. If you find that the pointer is pointing more to the right, it means that your note is high. So adjust the machine head accordingly. Tighten it if the note is flat and loosen it if the not is high.
Fig. A: Indication of guitar string not in tune
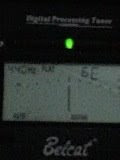
This is how the tuner is gonna show you when your string is in tune. The green light indicates that the guitar string is now in tune.
Fig. B: Indication of guitar string that is tune
That's it. Kinda easy to use the tuner. Again, I emphasize you to use the tuner instead of using method 1. Hope that helps.
Monday, May 18, 2009
How To Hold A Pick
Throughout the years of teaching, I've noticed that there are some common mistakes that beginners tend to make. One of the mistakes is holding a pick. The way you hold your pick will definitely affect your ability to play your instruments properly. This is especially crucial for those of you who is inspired to be a great lead guitarist. If you don't hold the pick properly, your lead playing will tend to be sloppy and you will have a high probability of dropping your pick when you solo.
Even if you don't intend to play lead guitar solos, it is still recommended for you to hold your pick properly because of very same reason of playing lead guitar. Rhythm guitarist tend to arpeggiate (play a chord as a series of ascending or descending note) too. So the consequences of poor pick holding is the same as lead guitaring.
So how do you hold a pick properly? Take a look at the photos below to have a greater understanding:

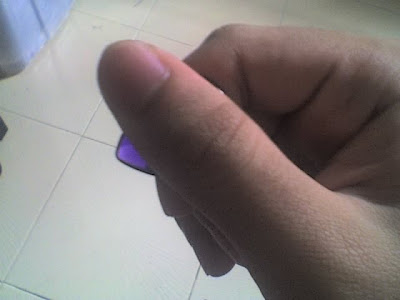
This is the proper way of holding a pick. Notice that there is a small area at the edge of the pick that shows up in the picture. Holding in this manner will allow you to have a better grip on the pick so that you can have a better control on your picking motion.
Fig A: Proper way to hold a pick
Now let's look at one of the most common mistakes that beginner does when holding a pick:

I tend to see this most of the time when teaching young guitar players. From my understanding, some of them tend to be afraid that part of their thumb will be rubbed with the strings and this will create a discomfort feeling over time. Here's my advise: Practice makes perfect. So keep practicing until you're able to play without any part of your thumbs touching the strings.
Fig. B: Wrong way to hold a pick
So below are the step by step photos on how to hold a pick.

Step 1: Place your pick on the index finger as shown on Fig. C.
Fig. C: Hold pick on the index finger
Step 2: Cover the top part of the pick with your thumb as shown in Fig. D
Fig. D: Cover top pick with thumb
Below is a picture of how it looks like when holding a pick properly when playing on the guitar. Notice that the skin of the thumb doesn't touch the strings.
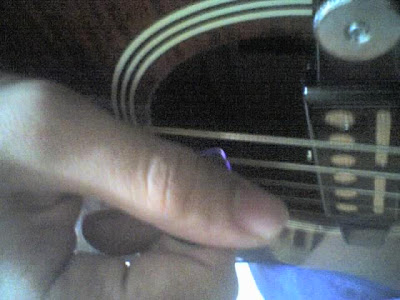
Fig. E: Holding the pick properly while playing guitar
It takes a bit of practice to handle it properly. So practice it and you'll be perfect in no time.
Even if you don't intend to play lead guitar solos, it is still recommended for you to hold your pick properly because of very same reason of playing lead guitar. Rhythm guitarist tend to arpeggiate (play a chord as a series of ascending or descending note) too. So the consequences of poor pick holding is the same as lead guitaring.
So how do you hold a pick properly? Take a look at the photos below to have a greater understanding:

This is the proper way of holding a pick. Notice that there is a small area at the edge of the pick that shows up in the picture. Holding in this manner will allow you to have a better grip on the pick so that you can have a better control on your picking motion.
Fig A: Proper way to hold a pick
Now let's look at one of the most common mistakes that beginner does when holding a pick:

I tend to see this most of the time when teaching young guitar players. From my understanding, some of them tend to be afraid that part of their thumb will be rubbed with the strings and this will create a discomfort feeling over time. Here's my advise: Practice makes perfect. So keep practicing until you're able to play without any part of your thumbs touching the strings.
Fig. B: Wrong way to hold a pick
So below are the step by step photos on how to hold a pick.

Step 1: Place your pick on the index finger as shown on Fig. C.
Fig. C: Hold pick on the index finger

Step 2: Cover the top part of the pick with your thumb as shown in Fig. D
Fig. D: Cover top pick with thumb
Below is a picture of how it looks like when holding a pick properly when playing on the guitar. Notice that the skin of the thumb doesn't touch the strings.

Fig. E: Holding the pick properly while playing guitar
It takes a bit of practice to handle it properly. So practice it and you'll be perfect in no time.
Sunday, May 17, 2009
Choosing Guitar Picks
Most of the time, in order to play guitar, you need to use a pick. There are many different kinds of picks available in the market to cater the type of songs/sounds that you're gonna produce. Here are are some of the different picks:

Fig. A - Stubby Picks

Fig. B: Fin Picks
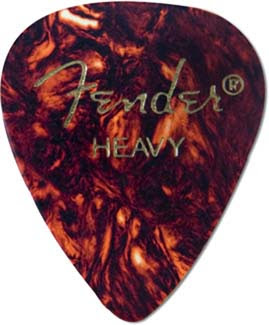
Fig. C: Fender Heavy Picks
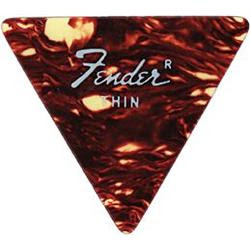
Fig. D: Triangular Picks
The shape, material and the thickness of each type of pick will affect your playing. If you're gonna play an acoustic guitar, I would suggest you get thinner picks. From personal experience, the sound and feel when playing an acoustic guitar is just awesome. If you use thicker picks on acoustic guitar, you're gonna have a hard time picking it because acoustic strings are more thicker compared to its electric counterpart.
Metal players usually use thinner picks because it allows greater control when playing heavier gauged strings.
Lead guitarists tend to use thicker picks because it provides more control of volume and attack on the strings. In the future, if you're into lead guitaring, I would suggest that you check out stubby picks. (Fig. A). I use it quite a lot and I find that the notes that i pick produces a crystal clear sound.
For starters, I would suggest checking out Fender Heavy/Medium picks. I felt that it is one of the most versatile picks that I have ever use to play just about almost any kind of genre, especially rock/metal music. But do explore on other different picks as you go along. You may never know one day, you might come across a pick that you like other than the ones I mentioned.
Saturday, May 16, 2009
Maintaining The Guitar Strings
Some players tend to change their strings once every few weeks while others, once every few months or so. From what I heard, the recommended time to change your string is once every two weeks. However, I don't recommend doing that, especially on electric guitar. Why? Because by doing so, it's going to be very expensive in the long run. And the tone of the old strings are almost identical to the new ones if you take care of your strings well. Another thing to note is that you are not able to focus more on your playing. Unless you wanna be a guitar tech, concentrate yourself more on your playing. And this is crucial, especially to beginners.
The rule here is that as long as the strings stay in tune even though it is rusty, you can still keep it. But who wants to play a guitar that has rusty strings? It is uncomfortable to play and is very brittle.
Fortunately, there is this one product that is very easy to use and is useful in maintaining the guitar strings so that you could be playing with it for a very long time before changing the set to a new one. You could also be saving tons of time from changing strings with it too. I use this product frequently and I strongly recommend you beginners to use it as well. The product is called GHS's Fast Fret. It is actually a lubricating oil for the strings. This will prevent your strings from rust, making it brittle and also very difficult to play.
Here's how the product looks like:
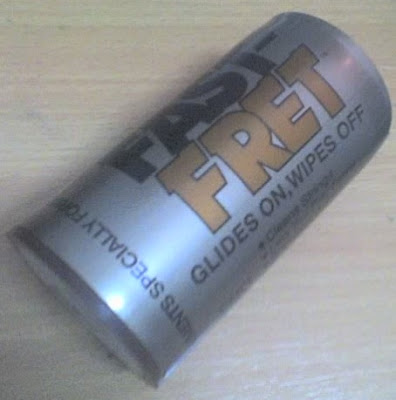

Fig. 1a & 1b: GHS Fast Fret
Below is a photo of what's inside the container:
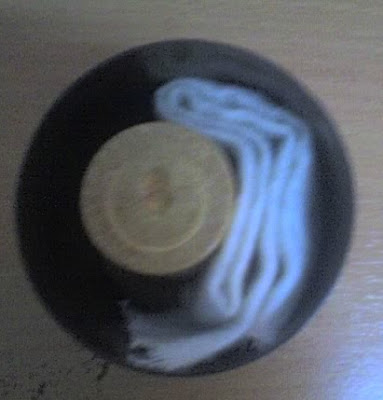
Inside the container, it contains two things; The stick and a piece of cloth.
Fig. 2: Inside GHS's Fast Fret
Here's how to use it:
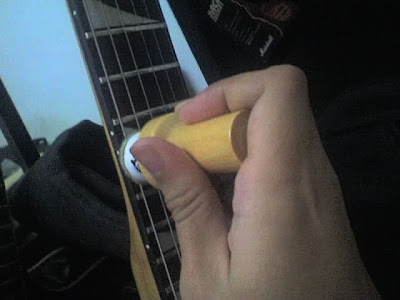
Just glide the stick over the all the strings from the headstock to the bridge. If there's an excessive oil, clean it up using the white cloth.
Fig. 3: Using GHS's Fast Fret
So when do you use this product? Use it everytime after you have finished playing for the day. Check it out as soon as you can.
Wednesday, May 13, 2009
How To Change Strings
Imagine this scenario:
Now that you got your guitar, you play it almost everyday, 24/7. Then one day, as you were playing, one of the strings snap. So how are you gonna replace the broken strings?
There are 3 ways:
1) You can go to any guitar shop and get it fix.
2) Get your experience friend to fix it for you.
3) Do it yourself.
If I were you, I would rather do it myself than relying on others. If you bring it to a guitar shop, they tend to include their own service charges on top of the price of the set of strings. So you tend to save up some cash if you do it yourself. If you ask your friend, you have to check with their schedule and yours in order to get it fixed. So its kinda tedious that way. Further more, as you gain more experience in playing guitar in the future, if you do not know how to change your guitar strings, you tend to portray yourself as an amateur guitarist because changing strings is one of the basics fundamentals that every guitarist should know.
So if you're thinking on how to go about doing it, look no further. Below is a detailed, step-by-step guide that I've created for you so that you can use it to change your strings by yourself.
1) Fit strings from the guitar body. On Fig. A, the strings go through from the back. On some guitars, the strings go through from the bridge. Examine your own guitar to find out where exactly you are suppose to fit the strings from the body part.
Fig. A: Fitting Strings From the Back
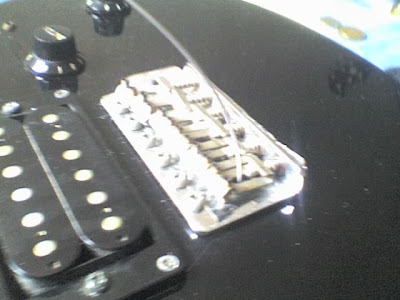
Fig. B: String comes out from the bridge after fitting it from the back

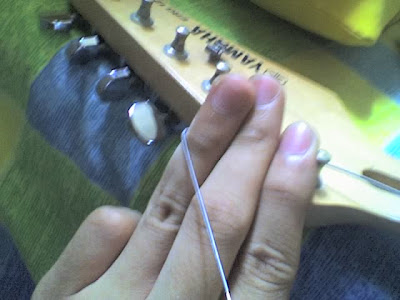
2) Pull the strings all the way to the headstock. Make sure there is not much slack on the strings between the bridge and the headstock. Then, apply the 3-finger rule as shown on Fig. C. This rule is made so that you are able to coil the strings to about 2-4 rounds on the machine head.
Fig. C: Using 3-finger rule
3) Make a sharp bend after the 3rd finger as shown on Fig. D
Fig. D: Making a sharp bend after applying 3-finger rule
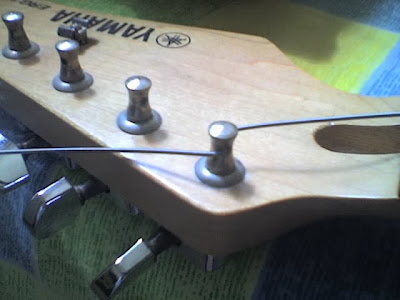
 4) Once the sharp bend has been made, fit the strings to the hole in the machine head as shown in Fig. E.
Fig. E: Fitting Strings to the hole in the machine head
5) Next, create another sharp bend (this time on a different direction compared to step 4) to the other opening in the machine head as shown in Fig. F. If you do it correctly, you can almost pick the guitar up with just that string.
Fig. F: Creating another bend
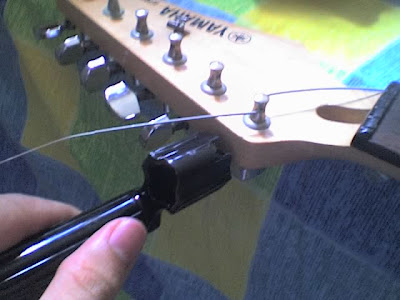 6) Tension the strings a little bit (Don't tune just yet!) until you're able to get a low tuning note, say, a low C on the sixth string. When winding the strings, be sure to use your right hand to pull the string away from the headstock. This creates a tension so that the strings are coiled neatly. Note: I recommend you to get a peg winder such as the one shown on Fig. G. This will greatly reduces the time and effort in winding the strings. It is very cheap and you can get it at any guitar shops out there.
Fig. G: Tensioning the string
7) Stretch the string as shown in Fig. H. This is to get the slack of the string out so that your string will stay in tune most of the time. Referring from step 6, once you have stretched the string, your tuning will go from C to let's say, B#. This is normal for every new strings. All you have to do is tune back to low C and repeat this process again up to a point where your string does not go out of tune anymore.
Fig. H: Stretching the strings
8) For the rest of the strings, repeat steps 1-7 again
9) Tune your guitar properly with an electronic tuner
10) Cut all the excessive strings that are dangling on the headstock with a snip plier or any wire cutter. This will ensure that your guitar will look neat and tidy.
Make step 10 a habit for you. That's because when you're performing in the future, people are going to look at you. If your excessive guitar strings are not cut, you tend to give the audience a bad impression about you. At least that's what I think. I get turned off easily with guitarists that doesn't cut the excessive strings when performing no matter how good he or she is. To me, it resembles your own identity. It lets your audience know what type of person you are. If you don't cut the strings, your audience will perceive you as a sloppy, messy kinda person in real life. So please cut those dangling strings.
Another thing to note about changing strings; you can replace just the string that is/are broken on your guitar. You don't have to necessarily change the whole set if you only break 1 string. Just replace that very 1 broken string will do. Much, much cheaper and time saving that way compared to changing the whole set.
Once you've done all of that, you're ready to rock and roll. :-)
Now that you got your guitar, you play it almost everyday, 24/7. Then one day, as you were playing, one of the strings snap. So how are you gonna replace the broken strings?
There are 3 ways:
1) You can go to any guitar shop and get it fix.
2) Get your experience friend to fix it for you.
3) Do it yourself.
If I were you, I would rather do it myself than relying on others. If you bring it to a guitar shop, they tend to include their own service charges on top of the price of the set of strings. So you tend to save up some cash if you do it yourself. If you ask your friend, you have to check with their schedule and yours in order to get it fixed. So its kinda tedious that way. Further more, as you gain more experience in playing guitar in the future, if you do not know how to change your guitar strings, you tend to portray yourself as an amateur guitarist because changing strings is one of the basics fundamentals that every guitarist should know.
So if you're thinking on how to go about doing it, look no further. Below is a detailed, step-by-step guide that I've created for you so that you can use it to change your strings by yourself.

1) Fit strings from the guitar body. On Fig. A, the strings go through from the back. On some guitars, the strings go through from the bridge. Examine your own guitar to find out where exactly you are suppose to fit the strings from the body part.
Fig. A: Fitting Strings From the Back

Fig. B: String comes out from the bridge after fitting it from the back

2) Pull the strings all the way to the headstock. Make sure there is not much slack on the strings between the bridge and the headstock. Then, apply the 3-finger rule as shown on Fig. C. This rule is made so that you are able to coil the strings to about 2-4 rounds on the machine head.
Fig. C: Using 3-finger rule

3) Make a sharp bend after the 3rd finger as shown on Fig. D
Fig. D: Making a sharp bend after applying 3-finger rule
 4) Once the sharp bend has been made, fit the strings to the hole in the machine head as shown in Fig. E.
Fig. E: Fitting Strings to the hole in the machine head

5) Next, create another sharp bend (this time on a different direction compared to step 4) to the other opening in the machine head as shown in Fig. F. If you do it correctly, you can almost pick the guitar up with just that string.
Fig. F: Creating another bend
 6) Tension the strings a little bit (Don't tune just yet!) until you're able to get a low tuning note, say, a low C on the sixth string. When winding the strings, be sure to use your right hand to pull the string away from the headstock. This creates a tension so that the strings are coiled neatly. Note: I recommend you to get a peg winder such as the one shown on Fig. G. This will greatly reduces the time and effort in winding the strings. It is very cheap and you can get it at any guitar shops out there.
Fig. G: Tensioning the string

7) Stretch the string as shown in Fig. H. This is to get the slack of the string out so that your string will stay in tune most of the time. Referring from step 6, once you have stretched the string, your tuning will go from C to let's say, B#. This is normal for every new strings. All you have to do is tune back to low C and repeat this process again up to a point where your string does not go out of tune anymore.
Fig. H: Stretching the strings
8) For the rest of the strings, repeat steps 1-7 again
9) Tune your guitar properly with an electronic tuner
10) Cut all the excessive strings that are dangling on the headstock with a snip plier or any wire cutter. This will ensure that your guitar will look neat and tidy.
Make step 10 a habit for you. That's because when you're performing in the future, people are going to look at you. If your excessive guitar strings are not cut, you tend to give the audience a bad impression about you. At least that's what I think. I get turned off easily with guitarists that doesn't cut the excessive strings when performing no matter how good he or she is. To me, it resembles your own identity. It lets your audience know what type of person you are. If you don't cut the strings, your audience will perceive you as a sloppy, messy kinda person in real life. So please cut those dangling strings.
Another thing to note about changing strings; you can replace just the string that is/are broken on your guitar. You don't have to necessarily change the whole set if you only break 1 string. Just replace that very 1 broken string will do. Much, much cheaper and time saving that way compared to changing the whole set.
Once you've done all of that, you're ready to rock and roll. :-)
Tuesday, May 12, 2009
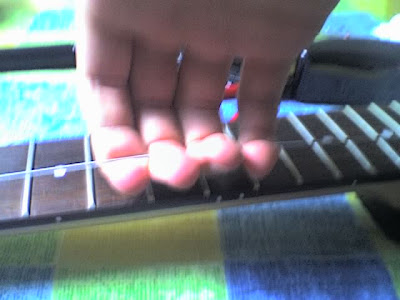
Guitar Strings - Choosing The Right Gauge Of Strings
There are many brands of guitar strings available on the market. Here are some of the more commonly used guitar strings:
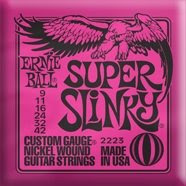

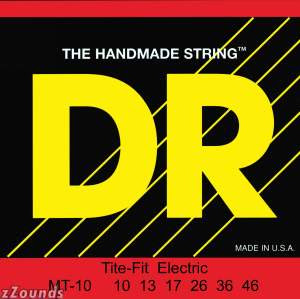
The one that i currently use is made from D'Addario. From personal experience, I find that D'Addario strings are more longer lasting compared to other brands out there. It doesn't break easily and it sounds great too. But do experiment with different brands as you progress. You might find that other brands are more suitable for you.
A thing to note about guitar strings: Use a set of lighter gauge strings when you are starting out. Unless you like pain, you wouldn't want to use a set of thicker gauge strings on your guitar.
So then, how do you know whether a set of strings are of thicker or lighter gauge? Take a look at the 3 pictures above. You'll notice that there are a set of 6 numbers in every package. Those are the string gauges. From the 3 pictures, the lighter ones have a gauge of .009 (That's how D'Addario name their string gauges. Ernie ball name it as 9 but it has the totally same meaning as the D'Addario's) for the high E-string (1st string, or the thinnest string) and a .042 for the low E-string (6th String, or the thickest string). To conclude, I'd have to say the Ernie ball's and the D'Addario's are lighter compared to the DR strings as the DR's 1st and 6th string gauges are 10 and 46 respectively compared to the other two companies which both have a gauge 9 for their 1st string and 42 for the 6th string.
I hope that helps you in choosing the right gauge of strings when you're starting out.
Wednesday, May 6, 2009
Names of guitar parts
While it is important for you to understand how to play the guitar properly, you need to also know at least the name of the guitar parts too. To me, this is pretty much important for beginners to know because if someone were to talk to you about certain guitar parts, let's say a pickguard, then you're able to identify it straight away without asking.
So here are the names of the guitar parts:

In the figure, the fingerboard is actually the top layer of the neck, also known as fretboard. Let's explore more on these parts:
Tuning Pegs/ Machine Head - For tuning the guitar
Headstock - The part where it houses the tuning pegs
Nut - It has small groovy slots for the strings to be able to guide along from the bridge to the headstock
Frets - The strips of metal shown. When a person says place your finger on 2nd fret, it means place your finger in between the first and the second fret from the nut.
Strings - The small, long metal rods that goes between the bridge to the headstock
Neck and Fingerboard - Fingerboard is the top layer of the neck, also known as fretboard
Pickguard - A protection cover for the body of the guitar. Prevents the guitar body from scratch made by the pick when playing aggressively.
Pickups - The 3, long white blocks (as shown in the figure). These are the parts that enables the transmission of the sound of the guitar to the amps
Pickup Selector - Lets you choose different kinds of tones for the guitar sound
Volume / Tone Knob - To adjust your volume and tone signals
Guitar Jack - A place for you to connect the guitar cables
Bridge/ Saddle - The other end parts for your strings to be fixed in place
Tremolo / Whammy Bar - A piece of equipment that looks like a metal rod. (Figure above)
Body - The place where the pickup selectors, volume/ tone knobs, pickups are housed.
Hope that gives you a clearer picture of the whole guitar parts.
Choosing An Amp
If you do a little bit of shopping, you will notice that some guitar shops sells a guitar and an amp together as a package. While this would deem as a bang for the bucks, i would often not recommend it. Why? Very often, you may get a better guitar but the amp would suck.
I had a friend who bought such packages a few years back. He saw such a beginner's package and purchased it. A few weeks later, he wasn't playing his guitar as much as he did when he was just starting out. It made me wondered why. One day, he went to my house to learn some stuff from me. As I had a small, extra practice amp, I told him to just bring his guitar down. So he did. When he plugged in his guitar to my amp, he told me that his guitar sounded great on my amp and wanted to know why. I asked him certain questions about his amp and concluded that his amp do not have a feature called Reverb.
While his guitar is quite a good quality one based on his budget, his amp is rather weak. It doesn't have any Reverb on it. Reverb is an effect that simulates the echo that naturally occurs when a sound is reflected off, for example, a wall. I have to stress that this feature is really important because it helps to color the tone of the guitar to make it sound more richer and livelier. And if you have a better tone, you'll definitely be more inspired to play.
So what's the price range for a decent practice amp you may ask? Depends. Different shop has different price tags but i can safely say that it is usually around $100-$200 bucks.
Below are some of the amps that I would recommend for starters:
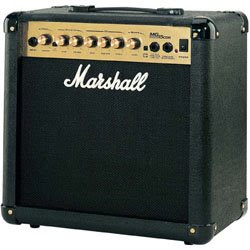
Marshall MG15CDR 15 Watt Combo Amp. One of the popular amps for starters. Made by a very famous amplification company. The spring reverb in this amp is amazingly sweet.

Line 6 - Spider III 15 15W Guitar Amp. This amp is great for playing clean as well as metal/rock. It also has quite a number of effects built in, so you're able to explore more kinds of sound with this amp.
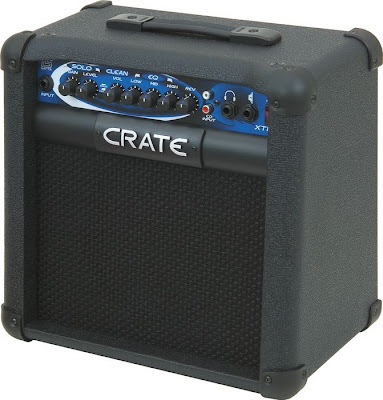
Crate XT15R 15W Guitar Combo Amp. For such practice amp, the tone of this amp is great. It also offers 2-channel operation that lets you practice with different setups.
That's about it for amps. I hope you're well informed as to why amps play a crucial role, especially for starters.
Tuesday, May 5, 2009
Buying A Guitar - Choosing the Right One
I remember during my high school days, my teacher once told me that if you were to spend money on something, it is advisable to look around for the items that you're planning to buy first before making a final decision. This is very, very true. I totally agree with what she said. And that goes for other purchases too apart from guitar/ guitar equipments.
When buying a guitar, shop around a little bit first before making the final decision. I strictly emphasize this because some other guitar shops might offer a better deal compared to the other. You know, some guitar shops might offer you a guitar that comes with a bag, cables etc for free while others might not throw you such freebies at the same price. In some cases, you might also be able to get a better guitar at the same price than the one that you're aiming for. So I suggest you might wanna do a little shopping first before making a final decision.
Here are some tips that you can use when you go shopping for an electric guitar (This goes for online shopping as well):
1. Look for what type of guitar you want. You can do this by looking at guitar catalogs, magazines, promotions etc. Once you do that, find out how much is the cost for it. If it's over your budget, don't worry. There are other more affordable ones for most of the common styles. You just have to look around a little bit more before you can stumble on the one that you like.
2. Try to find a refurbished guitar. Refurbished ones have a slight defect on it so its pretty much the reason why it can't be sold in the market. All of them are the same as those brand new ones. Occasionally, you can never tell the difference between the refurbished and the non-refurbished ones.
3. Never go alone when shopping around for an electric guitar. Grab an experienced guitarist friend of yours along with you when you go shopping for a guitar. Since he/she is more experienced, he/she will provide you with more guidance and advises in choosing an electric guitar.
4. Some people advises you to start with acoustic guitars and then when you get better, you can upgrade to an electric guitar. Reason for this is that they have a mindset that if you beginners did not get on to it after some time, then you are not wasting so much on your hard earn cash. I'd say scrap that ideology and just get yourself an electric guitar if that's what you wish for in the first place. While I understand where some of these people are getting at, most of them tend to recommend you an acoustic guitar with super high actions ( The gap between the fretboard and the strings - see my other post for clearer picture) that also comes with thicker strings (acoustic strings generally have a thicker strings that makes your fingers painful when pressing it) that it is so hard to play and eventually, you might have a high chance of losing interest in playing guitar because you think you suck and you can't play well when in reality, these people are the ones that are to be blamed because of giving such a false advise. Another thing to note about such advise is that nowadays, electric guitar is more affordable now as opposed to previous years. It does not cost a bomb anymore even when getting a starter's package. So even if you don't get on to it after a while, not much money is wasted. I'd recommend you to beware of such advises if you happen to hear one.
5. When buying a guitar, it is extremely important to know that you will get a great quality guitar for a skyrocketing price and vice versa. In other words, you get what you paid for. When choosing a guitar, there has to be a compromise between quality and price. If I were you, I would stay within my budget. Never go for a very bottom end guitars. Even though they are cheap, their quality might be so bad that on some occasions, the guitar has to be sent for repairs a few months after purchase. I had a friend of mine who bought a cheap electric and after a few months, he had to send it for repairs because of some wiring/ pickup problems. To play safe, go for a well known brand by checking out some guitar catalogs and analyze which brand appear frequently. At least most of these cheap, well known brands have certain quality standards. You'll probably won't have so much trouble with your guitar that way.
6. If you're buying from a shop, have the sales assistant to properly set up the guitar for you before you go to the counter. Sometimes, some guitar shops just shipped in new stock of guitars and they were unable to check whether all of them are set up correctly or not due to time constraint on their part.
Guitar Guide For Beginners
To fellow readers,
Thanks for checking out my blog. This blog is specially designed as a guide for electric guitarists out there who are just starting out. I will be covering topics from some of the very basic stuff such as buying a guitar, maintaining it to learning how to play simple stuff in details. I'll be putting new topics almost everyday if I'm free. So come back often to check out on new updates. :-)
So stay tune..
Slick
Subscribe to:
Posts (Atom)